
Have you been looking for a stylish new way to enhance your nails and mix up your look? Acrylics might be the answer. Giving yourself an acrylic manicure can seem intimidating if you’re just starting in the nail world. But with the right knowledge and products on your side, you can apply, sculpt, and design your gorgeous acrylic nails in no time.
There’s no time like now to venture into the world of acrylics. Find everything you need to get started with this beginner’s guide to acrylic nail systems.
What Are Acrylic Nails?
Acrylic nails are a type of artificial nail that consists of two components: a liquid monomer and a powder polymer. You can create a smooth paste that bonds to your natural nail and creates extra length and thickness by combining these two components. Acrylic nails allow you to sculpt your nails to whatever shape you desire, giving you more creative freedom over the final look of your manicure.
Acrylics also create a strengthening layer to your natural nail, making them more durable and longer lasting. As such, acrylic nails are the way to go when you want a longer-lasting look. With proper application and care—including touchups when your nail starts to grow out—acrylics typically last around six to eight weeks with the required care and refills.
Start With the Right Products
As with any beauty technique, beginning the acrylic process with the right products is important. High-quality products are easier to use and create a shinier, healthier, more vibrant look for your nails. Every beginner needs a few essentials to start doing their acrylic nails, including liquid monomer, acrylic powder, and basic nail care tools. Here are the ins and outs of the most important tools you’ll need to get started.
Liquid Monomers
The first piece of any acrylic kit is the liquid monomer. This is the liquid you will use to combine with your acrylic powder to make the nail. Most liquid monomers consist of ethyl methacrylate (EMA). These formulas have a purple tone, which helps prevent yellowing and create a clean, beautiful look for your nails.
You can also find UV/LED monomers that need to cure under a UV or LED lamp. These monomers don’t have the traditional smell of monomers, making them ideal for tight spaces with low ventilation.
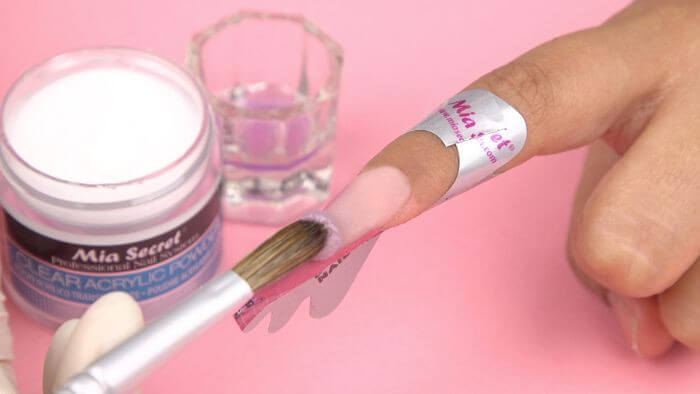
Acrylic Powders
Acrylic powders are the second component needed to make beautiful acrylic nails. You can use clear acrylic powders, which only consist of the powder you need to create the acrylic and bond it to your natural nail, or color powders. Color powders come in nudes and cover shades, regular colors, or other fun options like metallics and glitters. The clear powder is best for adhesion, but you should try experimenting with both clear and color powders to master the consistency of both.
Nail Prep Tools
In addition to your acrylic nail systems, you’ll want a few essential nail care tools to help prep your natural nail, shape the acrylic, and give your look a more professional finish. Use nail files or drills to prep and shape your nail. You’ll also want a cuticle pusher to push your cuticles back and create a clear surface on your nail bed.
Nail Prep Products
Finally, use a dehydrator, such as Mia Secret’s Nail Prep, followed by a primer—such as Mia Secret’s no-burn, acid-free Xtrabond Primer—to remove any lingering oils or other substances on your nail. Doing so creates a clean base and stronger adhesion for a smoother, longer-lasting acrylic nail.
Nail Tips
Nail tips are optional, but they’re still important to learn about—especially if you want to create longer nails during your acrylic manicure. These tips consist of acrylic plastic and help lengthen the look of your nail. Glue them on after you’ve prepped your natural nail bed if you decide to use them.
Next, use cutters and your nail file to shape the nail tip into the look you want. You’ll also want to file or buff the base of the nail tip to eliminate any ridges and create a smooth transition from natural nail to nail tip.
Top Coat Seals
You’ll also want a top coat to complete your look and help your nails last even longer. An air-dry top coat will dry naturally in a matter of minutes without the help of lamps or other tools. You can also use a high gloss top coat, such as our Mia Secret Finish Gel, and cure it under a UV or LED lamp.
Creating the Right Liquid-to-Powder Ratio
One of the biggest things to master as a beginner in acrylic nail systems is the ratio of liquid monomer and acrylic powder. The goal is to create a bead of mixture on your brush that is smooth, glossy, and easy to work with, but this can take some practice. Your bead will be runny and messy if you use too much liquid. Too little liquid creates a dry and chalky look that is difficult to work with.
Perfect your ratio by practicing either with spare nail tips or by making beads to place on a napkin. Try to get a smooth and glossy bead on your brush that spreads easily and creates even, consistent color coverage.
Apply From the Base to the Tip
Once you’re ready to apply the acrylic to the nail, you can use a few techniques to make the process simpler. Remember to work your way from the nail bed to the nail tip. One way to do this is by using a single ball of acrylic to cover the whole nail. Start close to the cuticle without touching it and work your way to the tip of the nail. It helps to angle the nail down so gravity can help the acrylic move along the nail.
You can also break the nail up into sections and apply multiple beads instead of coating the entire nail in one go. For example, apply your first bead halfway down the nail and sculpt it to the tip, then apply a second bead close to the cuticle and sculpt that down to the tip as well. No matter which technique you use, be sure to coat the nail evenly and smooth out any bumps to create a clean, polished look.
Don’t Be Afraid To Experiment
Once you have the desired shape and color of your acrylic nail, it’s time to have some fun with additional designs. The design step is the perfect opportunity to explore nail paints, glitter, jewels, and other accessories that will make your nails pop. Never be afraid to experiment with the look of your nails. Even if you mess up, it’s just a learning experience that you can use to sharpen your skills and work your way to creating salon-quality nails that will gather compliments everywhere you go.
Have you been inspired by our beginner’s guide to acrylic nail systems? Our nail kits get you started with high-quality tools and products to help you learn to create fabulous, creative looks. Find everything you need to try making beautiful nails at home when you browse the acrylic nail system kits available at Mia Secret today.
